Aholo 3D for Beginners: Your First 3D Scan — A Complete Guide
A complete beginner's guide to Aholo 3D scanning — covers what 3DGS is, what equipment you need, the three golden rules (lock exposure, 70% overlap, keep everything still), and a step-by-step first single-object scan.
1. Before You Start: What Is Aholo 3D?
1.1 What Aholo 3D Does
Aholo 3D is a web-based 3D reconstruction platform powered by 3D Gaussian Splatting (3DGS) — a cutting-edge AI technique that turns a series of photos into a photorealistic, walkable 3D scene. Unlike traditional 3D modeling, which requires hours of manual work, 3DGS reconstructs your object or space directly from images.
In plain way: you take photos from different angles, upload them to Aholo 3D, and the it builds a 3D model you can explore, edit, measure, and share — all from your browser.
New to 3DGS? Read our explainer: What Is Gaussian Splatting?
1.2 What Can You Create?
| Use Case | What You'll Get |
|---|---|
| Single object | A 360° rotatable 3D model of a product, collectible, or personal item |
| Indoor space | A walkable digital twin of a room or interior |
| Outdoor scene | A navigable 3D environment of a garden, courtyard, or street |
| Virtual tour | An immersive walkthrough ready to share with a link |
1.3 What Equipment Do You Need?
You can start with what's already in your pocket:
Minimum setup:
- A smartphone with a decent camera (most phones from the last 2-3 years are fine)
- The object or space you want to scan
- Aholo 3D Studio account (free to start)
Recommended for better results:
- A tripod (even a cheap phone tripod helps enormously)
- Controlled lighting (avoid harsh shadows)
- A camera or phone capable of 4K resolution
2. The Three Golden Rules of 3D Scanning
Before you press the shutter, understand these three principles. They're the difference between a crisp, complete 3D model and a broken mess.
2.1 Lock Your Exposure
Your camera's automatic settings are the enemy of 3D reconstruction. Here's why: auto-exposure changes brightness between shots, auto-white-balance shifts color temperature, and auto-focus can change the focal plane. All of these create inconsistencies that confuse the reconstruction algorithm.
What to lock (and how):
| Setting | Why It Matters | How to Set It |
|---|---|---|
| Shutter speed | Prevents motion blur between shots | Set to 1/240s or faster. On most phones, use Pro/Manual mode |
| ISO | Controls image noise | Set as low as possible while keeping the image bright enough. Higher ISO = more noise = worse reconstruction |
| White balance | Keeps colors consistent across all photos | Pick a fixed preset (e.g., "Daylight" or "Cloudy") — never auto |
| Exposure | Keeps brightness uniform | Lock exposure on a mid-tone area of your subject |
On iPhone: Use a third-party app like Halide or ProCam to access manual controls. On Android: Most camera apps have a Pro/Manual mode built in.
Pro tip: If the sun is your light source, shoot fast. Direct sunlight changes dramatically within 30 minutes — especially around midday. Overcast days are much more forgiving.
2.2 The 70% Overlap Rule
Every photo you take must share at least 70% of its content with the previous photo. This is non-negotiable.
Think of it like a panorama: the algorithm needs enough common reference points between images to figure out how they connect in 3D space. If you move too far between shots, the connection breaks — and your model will have gaps or fail entirely.
How to achieve 70% overlap:
- Move slowly and deliberately between shots
- Take one step at a time (for indoor spaces)
- Use a wider lens to get more overlap with fewer shots
- After shooting a batch, review your photos — the visual overlap should be obvious
Note on wide-angle lenses: Ultra-wide and fisheye lenses give you more coverage per shot, which makes overlap easier — especially in tight spaces. But extreme distortion can slow down processing. A moderate wide-angle (around 120° like an action camera) is the sweet spot.
2.3 Keep Everything Still
This rule applies to everything in your frame:
- People and animals — must stay completely still. A person walking through your shot creates a ghost in the model.
- Trees and plants — wind causes leaves and branches to move, creating inconsistent shadows and geometry.
- Lights — cheap LED bulbs often flicker at frequencies invisible to the eye but visible to your camera. This causes brightness fluctuations between frames. If you can, use natural light or quality studio lighting.
- Shadows — if you're shooting outdoors, tree shadows move with the sun. The longer your shoot takes, the more noticeable this becomes.
The bigger the scene, the more unforgiving this rule becomes. A small object on a table is forgiving. A full outdoor courtyard is not.
3. Your First Scan: Single Object (Step by Step)
We'll start with a single object — the most beginner-friendly scenario. Choose something opaque, non-reflective, and roughly the size of a shoebox or smaller. A ceramic mug, a wooden figurine, or a potted plant (with still leaves) are all good first subjects.
3.1 Prep: Background, Lighting, Tripod
Background:
- A plain, solid-colored background works best. Think white poster board or a neutral wall.
- Important exception: If your object has a very plain, uniform surface (e.g., a smooth white vase), a plain background makes it hard for the algorithm to find matching points. In that case, add some visual texture to the background — a patterned cloth, newspaper, or printed markers.
Lighting:
- Use soft, diffused light. A window on an overcast day is ideal. A lightbox or softbox is even better.
- Avoid hard directional light that creates deep shadows.
- If indoors, turn off overhead fluorescents that might flicker.
Tripod:
- A tripod keeps your camera stable and at a consistent height.
- Even better: place your object on a turntable and keep the camera fixed. This gives you perfectly consistent framing.
- Do not rotate the object on a turntable while the background moves — the algorithm needs the background to stay still relative to the camera. If you use a turntable, rotate the object, shoot, stop, shoot again.
3.2 Camera Settings (Your Phone Can Do This)
Pull up your phone's Pro/Manual mode and set:
| Parameter | Setting | Why |
|---|---|---|
| Resolution | 4K or higher | Higher resolution = more detail captured. 8K is better if your phone supports it. |
| Shutter speed | 1/240s or faster | Freezes any hand-held movement |
| ISO | As low as possible (100-400) | Lower ISO = less noise. Only raise it if the image is too dark. |
| White balance | Fixed preset (not auto) | Keeps color consistent across all photos |
| Focus | Manual focus, locked on the object | Prevents the camera from hunting between shots |
What about focus stacking? For product-quality results, professionals use focus stacking — taking multiple shots at different focal distances and merging them into one fully-sharp image. This is ideal for small objects shot up close, but it's an advanced technique. For your first scan, just make sure your subject is in focus.
3.3 Shooting Strategy: Orbit + Multiple Heights + 70% Overlap
This is the core technique. Follow it exactly.
Step 1 — Orbit at eye level: Walk (or rotate the turntable) around the object in a full circle, taking a photo every few degrees. Each photo should overlap the previous one by at least 70%. For a shoebox-sized object, you'll typically need 20-40 photos per circle.
Step 2 — Repeat at a higher angle: Raise your camera and do another full circle, this time shooting downward at about a 35° angle. This captures the top surfaces.
Step 3 — Repeat at a lower angle: Lower your camera and shoot upward at about a 35° angle. This captures the underside details.
Step 4 — Check your coverage: Quickly scroll through your photos. Can you see the object from every conceivable angle? If there's a gap, fill it in.
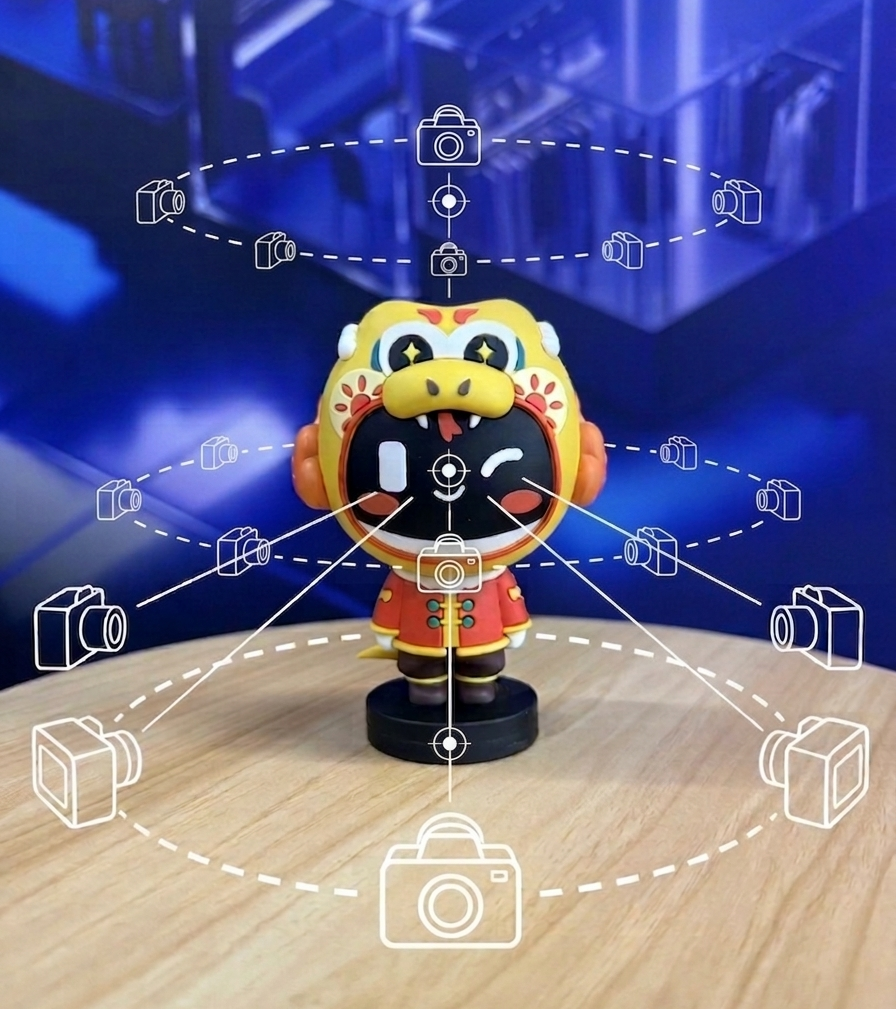
How many photos total? For a single object: 60-120 photos is typical. More is better than fewer — you can't have too much coverage, but you can absolutely have too little.
3.4 Upload to Aholo 3D and Wait for Reconstruction
- Go to studio.aholo3d.com and sign in
- Create a new project and select "Object Reconstruction"
- Upload all your photos (drag and drop works)
- Click "Create"
- Wait — processing typically takes a few minutes depending on the number of photos
The reconstruction runs in the cloud, so you'll see a progress indicator.
3.5 View, Edit, and Share Your First 3D Model
Once reconstruction is complete:
- Explore: Click and drag to rotate, scroll to zoom, right-click and drag to pan. Your model is fully interactive.
- Edit: Use the built-in tools to crop away unwanted background, measure distances, or add annotations.
- Share: Click "Share" to generate a link. Anyone with the link can view your 3D model in their browser — no app install required.
Learn what else you can create: How to Create a 3D World with AI Spatial Generation
4. Six Factors That Make or Break Your Scan
If your first scan doesn't come out perfect, one of these six factors is usually the culprit. Here's what to check.
4.1 Sharpness — Blurry Photos = Failed Reconstruction
This is the #1 cause of bad scans. The algorithm needs crisp, sharp images to detect feature points. If your photos are blurry:
- Your shutter speed was too slow → use 1/240s or faster
- Your hands were shaking → use a tripod
- Your subject was too far away → move closer
The difference is dramatic. A slightly blurry image extracts far fewer usable feature points than a sharp one — even at the same resolution.
4.2 Resolution — 4K and Above
Higher resolution captures more detail. 4K (3840 x 2160) is the practical minimum for good results. 8K is better, especially for larger objects or spaces.
4.3 Angle Diversity — Cover Every Side
The algorithm can only reconstruct what it can see. If you never photographed the top of your object, the top will be missing or blurry in the 3D model.
Checklist before you stop shooting:
- Front, back, left, right — covered?
- Top (looking down) — covered?
- Bottom (looking up, if accessible) — covered?
- Any recessed areas or crevices — covered?
4.4 Shutter Speed — 1/240s or Faster
This deserves its own section because it's so commonly overlooked. A shutter speed of 1/240s or faster eliminates motion blur from hand movement. If you're using a tripod and shooting completely still objects, you can go slower — but for handheld shooting, 1/240s is the baseline.
4.5 Lighting — Soft, Even, and Consistent
| Good Lighting | Bad Lighting |
|---|---|
| Overcast day outdoors | Direct midday sun |
| Softbox or diffused LED | Bare bulb or harsh spotlight |
| Even illumination across the subject | Strong shadows on one side |
| Consistent throughout the shoot | Changing as clouds pass |
The ideal outdoor condition: Overcast sky. The clouds act as a giant softbox, giving you even, shadow-free light that stays consistent for hours.
4.6 ISO — Keep It Low, Control the Noise
High ISO introduces grain (noise) into your images. Noise creates false "features" that confuse the reconstruction algorithm.
Rule of thumb:
- ISO 100-400: Excellent
- ISO 400-800: Acceptable if lighting is good
- ISO 800+: Avoid unless absolutely necessary
If your images are too dark at low ISO, add more light — don't just crank the ISO up.
5. Troubleshooting: Common Problems and How to Fix Them
5.1 Why Does My Model Have Holes?
Holes or missing areas appear when the algorithm didn't have enough photos covering that angle. Solution: Shoot more photos from the missing angle, making sure each one overlaps with the existing coverage. Then re-upload with the additional photos.
5.2 Can I Scan Transparent or Reflective Objects?
Not reliably — yet. Glass, mirrors, polished metal, and clear plastic are extremely difficult for photogrammetry-based reconstruction. The algorithm can't "see" the surface properly because reflections and refractions change with every angle.
Workaround (for less reflective objects): Try applying a temporary matte spray (like athletes' foot spray) to dull the surface. This is a common trick in professional 3D scanning.
5.3 What If My Object Has a Plain, Featureless Surface?
A solid white ball or a smooth monochrome vase has very few unique visual features for the algorithm to latch onto. Solutions:
- Add texture to the background (patterned cloth, newspaper)
- Place small markers or stickers on the object itself (removable)
- Project a pattern onto the object using a projector
5.4 How Many Photos Do I Really Need?
| Scenario | Recommended Photos | Minimum |
|---|---|---|
| Small object (< 30cm) | 60-120 | 40 |
| Medium object (30cm-1m) | 100-200 | 60 |
| Indoor room | 200-500 | 150 |
| Outdoor space | 300-800+ | 200 |
When in doubt, shoot more. You can always exclude bad photos before uploading.
6. What's Next? From Single Objects to Full Spaces
Once you've nailed your first object scan, you're ready for bigger things:
-
Scan a room: Learn how to create a walkable digital twin of an interior space. The principles are the same — you just need more photos and a planned shooting path.
-
Create an outdoor scene: Gardens, courtyards, building exteriors. Check our shooting guide for outdoor-specific tips on weather, timing, and managing large areas.
-
Go AI-powered: Upload a single photo and let Aholo 3D's AI Spatial Generation turn it into a navigable 3D world.
FAQ
Q: Do I need a special camera? A: No. A recent smartphone (iPhone 14 or newer, or equivalent Android) is perfectly capable. A DSLR or mirrorless camera will give you better results, but it's not required.
Q: How long does reconstruction take? A: For a small object (60-120 photos), typically 5-15 minutes. Larger scenes take longer. Processing runs in the cloud, so you don't need a powerful computer.
Q: Can I edit the model after it's created? A: Yes. Aholo 3D includes built-in tools for cropping, measuring, and annotating your 3D models.
Q: What file formats can I export to? A: PLY and SPZ formats are supported for 3D model export. You can also export videos and screenshots.
Q: Is Aholo 3D free? A: Aholo 3D offers a free tier to get started. Create your account at studio.aholo3d.com and try your first scan today.
Q: Can I scan a room with a 360 camera? A: Yes. 360 cameras can dramatically speed up indoor scanning by capturing all directions at once. However, the per-face resolution is lower than a traditional camera, so there's a trade-off in detail.
Q: What's the biggest mistake beginners make? A: Moving too fast between photos. Slow down. Check your overlap. You can't rush 3D scanning — the extra 5 minutes spent shooting carefully saves you an hour of failed reconstructions.
Ready to create your first 3D model? Start scanning free on Aholo3D Studio.